
In this Writer's Room tutorial, Andela community member Stephen Henry explains how to integrate ML face detection into an Android app using CameraX.
In this age of Artificial Intelligence, mobile applications are leveraging the power of machine learning to provide intelligent features to users. One such feature is face detection, which allows developers to identify and analyze faces in real-time using the users’ device’s camera.
In this tutorial, we will explore how to integrate ML face detection into an Android app using CameraX, a Jetpack library for camera development. We will walk through the codebase and understand the key components involved in building an ML face detection feature. So let’s get started!
Prerequisites:
This is not an entirely beginner-level blog and therefore, before we start the process, please ensure you have the following:
- Android Studio installed on your development machine.
- A basic understanding of Android app development with Kotlin.
- Familiarity with CameraX and its core concepts.
Setting up the project:
To start, create a new Android project in Android Studio. Open the project’s build.gradle file and ensure the required dependencies are added with the latest versions if you require them. Here's an example of the necessary dependencies:
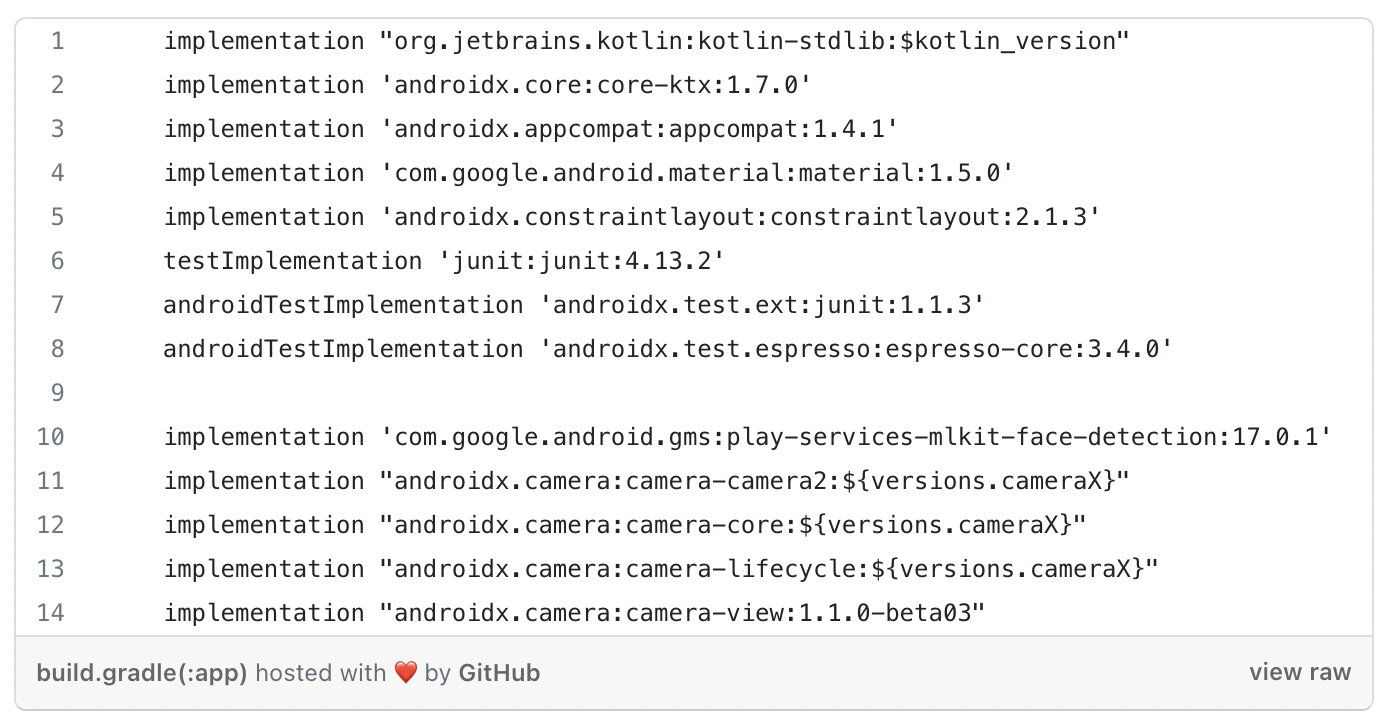
Once the dependencies are added, sync the project to fetch the required libraries.
CameraX configuration:
The first step is to configure CameraX to capture the camera feed and process the frames for face detection.
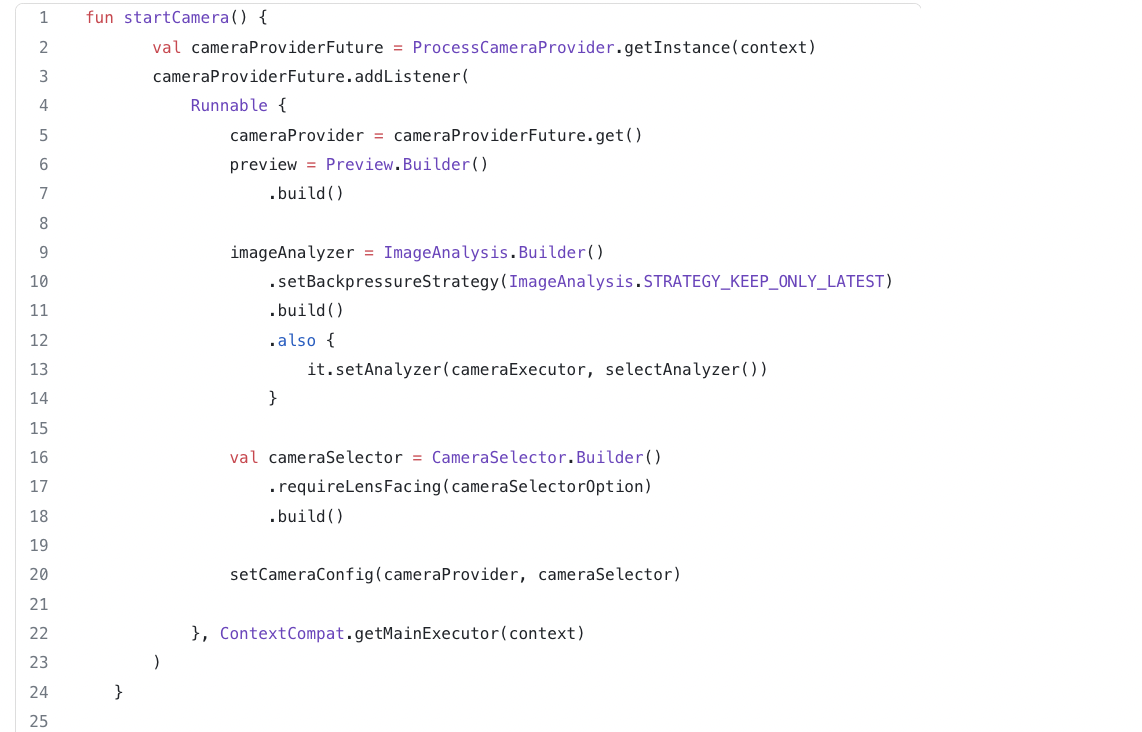
We will therefore, create CameraManager class responsible for setting up and managing the camera.
Let's understand the key components of this class.
- CameraManager: The CameraManager class handles the camera setup, image analysis, and face detection. It takes the Context, PreviewView, LifecycleOwner, GraphicOverlay, and a callback function as constructor parameters.
- startCamera(): The startCamera() method initializes the camera provider, preview, and image analysis use cases. It sets up the camera selector, binds the use cases to the camera lifecycle, and configures the preview surface provider.
CameraManager:
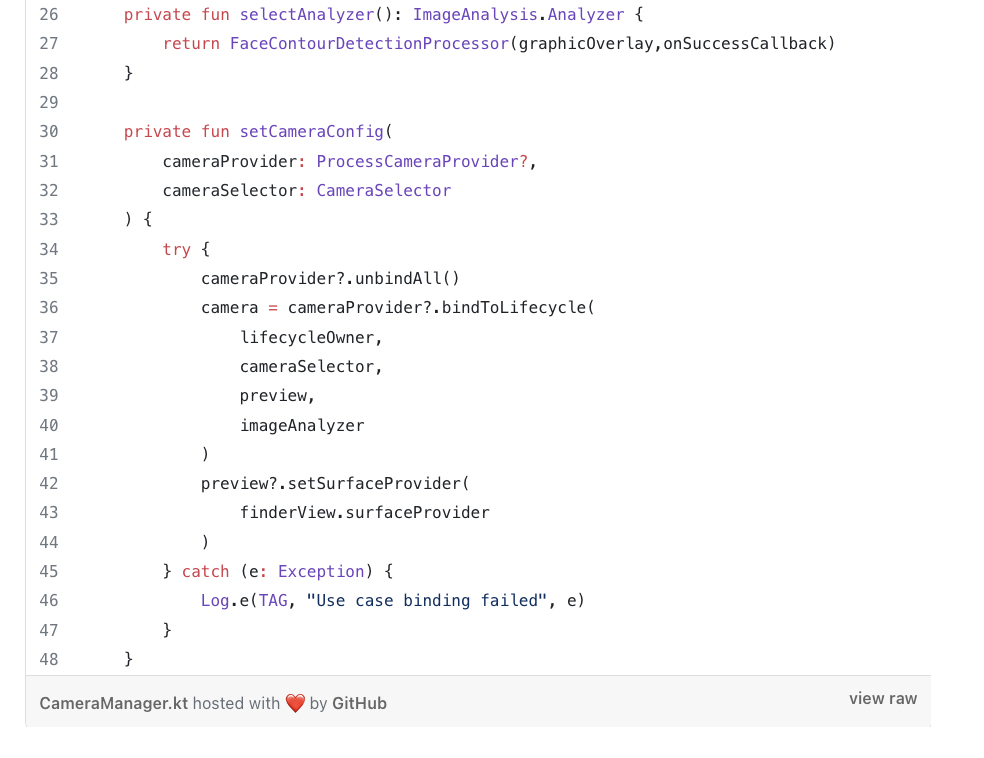
3. ImageAnalysis and FaceContourDetectionProcessor: Inside the CameraManager, we have an ImageAnalysis use case that processes each frame from the camera feed. It uses the FaceContourDetectionProcessor, which extends BaseImageAnalyzer, to perform face detection using ML Kit.
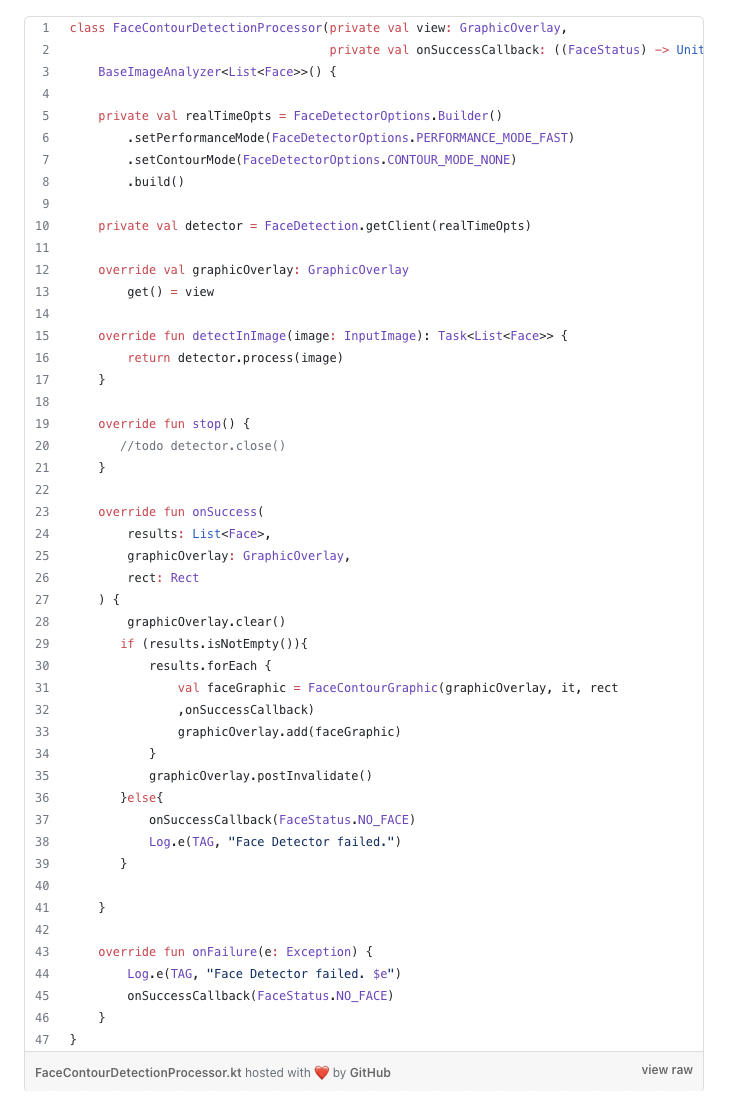
The detectInImage() method takes an InputImage and performs face detection using the ML Kit Face Detection API. It returns a Task<List<Face>>that represents the asynchronous face detection process.
The onSuccess() and onFailure() methods handle the results of the face detection process. In the onSuccess() method, we iterate over the detected faces and create FaceContourGraphic objects to draw face contours on the GraphicOverlay. If no faces are detected, the onSuccessCallback is called with a FaceStatus.NO_FACE status.

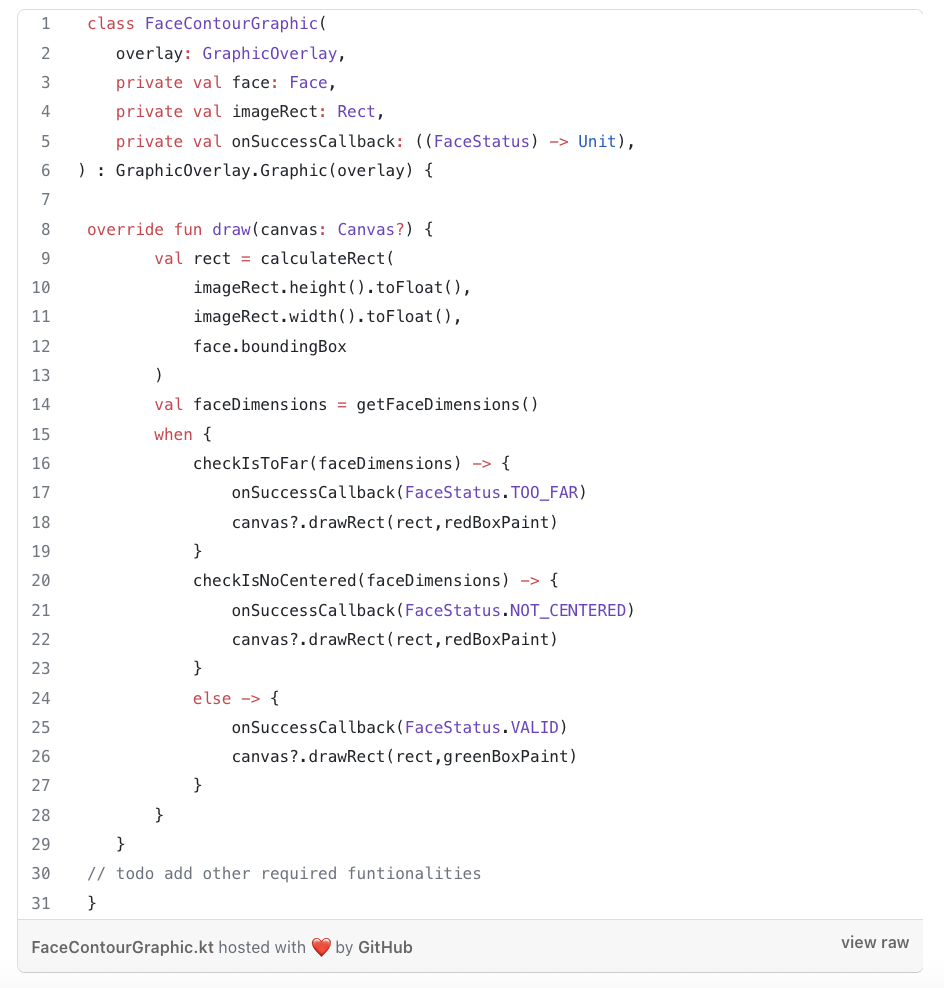
Drawing face contours:
To visualize the detected faces, we need to draw face contours with the help of a custom view class GraphicOverlay which provides drawing functions to draw the contours and FaceContourGraphic class that extends GraphicOverlay.Graphic and represents a single face detected by ML Kit. It receives the GraphicOverlay, the detected Face, the image rect, and the onSuccessCallback as constructor parameters. It overrides the draw()method to draw the face contours on the overlay.
Inside the draw() method of FaceContourGraphic, we extract the face contours from the detected Face object and iterate over each contour to draw the lines on the overlay. We use the GraphicOverlay's provided drawing functions to draw the contours.
Displaying the camera feed and face detection overlay:
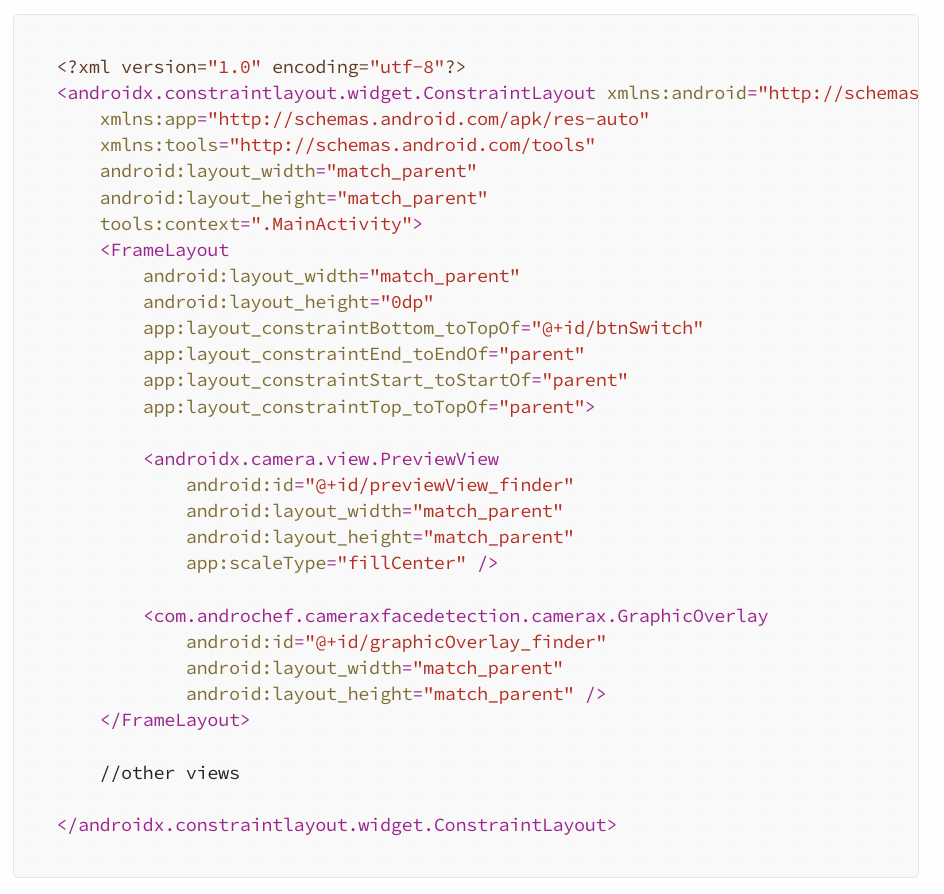
To display the camera feed and the face detection overlay, we use the PreviewViewand GraphicOverlay custom views.
activity_main.xml:
In the layout file, we include the PreviewView and GraphicOverlay to show the camera preview and the face detection overlay. We position the GraphicOverlay on top of the PreviewView using a FrameLayout.
MainActivity:
Inside the MainActivity, we initialize the CameraManager and provide the required parameters such as the Context, PreviewView, LifecycleOwner, and GraphicOverlay.
Conclusion:
In this tutorial, we explored how to integrate ML face detection into an Android app using CameraX. We’ve walked through the key components involved in building a face detection feature. By leveraging ML Kit’s face detection API, we were able to detect faces in real-time and draw their contours on the camera feed. You can now take this knowledge and extend the functionality by adding additional features or customizations to suit your app’s needs.
Remember to handle the necessary permissions and camera-related checks before running the code on a device. Feel free to experiment with different ML Kit features and explore other possibilities of integrating machine learning into your Android applications.
That concludes our guide to Android ML face detection with CameraX. Happy coding!
Here is the link to the full project on GitHub.