Software development involves process and people. The people include both technical and nontechnical stakeholders, but because the process is primarily technical, it can create a large gap between technical and nontechnical stakeholders.
Bridging this gap requires a collaborative approach that uses natural language to encourage communication and collaboration between technical and nontechnical stakeholders. This is precisely what behavior-driven development (BDD) aims for: to bring a point of understanding among developers, testers and business stakeholders.
As a software engineer, I’ve been implementing BDD using one of the most popular tools, Cucumber. Cucumber helps business and technical teams work together by collaborating on executable specifications. The BDD specifications also double as automated tests. Using the Gherkin framework, these specifications are written collaboratively, aligning the team with living documentation of your system’s work.
In this article, I will explain five simple steps for integrating Cucumber testing into your Android application.
Why Use Cucumber For UI Testing
- It supports various programming languages, including all Java Virtual Machine (JVM) languages.
- It integrates seamlessly with the Espresso framework for user interface (UI) testing.
- It enables anyone to write plain-text descriptions of the desired behavior in any spoken language and run automated tests using these descriptions. Its plain-language parser, Gherkin, facilitates this, as it specifies expected software behaviors in a clear and logical language understandable to customers, stakeholders, managers, developers, quality assurance (QA) testers and others.
- It provides excellent documentation about your application.
- It can run automated acceptance tests using BDD.
Set Up Android Studio for Testing With Cucumber
Let’s dive into setting up Android Studio for Cucumber Tests.
Prerequisites
Before you start, make sure you have the Android Studio integrated development environment (IDE) installed.
You can also consider installing the following plug-ins from the Android Studio marketplace:
- Cucumber for Kotlin and Android: This plug-in from Finanteq enables Cucumber support with step definitions written in Kotlin. It allows running Cucumber scenarios as Android instrumented tests directly from the IDE.
- Gherkin and Cucumber for Java by JetBrains: These add support for the Gherkin language, which the Cucumber testing tool uses, and provides coding assistance for step definitions.
1. Create an Android Studio Project With Dependencies
Create a new Android Studio Project in your IDE, or use an existing one. Next, add the Cucumber dependencies.
In your app-level module build.gradle file, add the following dependencies:
androidTestImplementation("io.cucumber:cucumber-android:7.14.0")
androidTestImplementation ("androidx.test:rules:1.6.1")
2. Create Your Instrumentation Runner
In app/src/androidTest/java/com/your/app/, create a custom instrumentation runner named CucumberTestInstrumentation.java. Add this class to your build.gradle under android > defaultConfig:
defaultConfig {
   .....
   testInstrumentationRunner "com.your.app.CucumberTestInstrumentation"

}
You have successfully set up Android Studio for Cucumber, so you can now proceed to the exciting part.
3. Given, When, And and Then
Gherkin is a domain-specific language that describes the implementation of a feature step by step using nontechnical terms. It uses the keywords Given, When, And and Then to explain the steps. These steps can be written in any human-spoken language, such as English, Arabic or Luo.
Here is an example Gherkin feature scenario written in English that I will use in this project:
Feature: Ability of the customer to login
Scenario Outline: Where the customer requests to log in
Given the login screen is displayed to the customer
When the customer enters email "<email>"
And the customer enters password "<password>"
And the customer requests to log in
Then the login status will be "<status>"
Examples:
| email                 | password   | status        |
| [email protected]   | qwerty1234 | Login Failed  |
| [email protected]     | somePass02 | Login Failed  |
| [email protected] | sayNerd001 | Login Success |
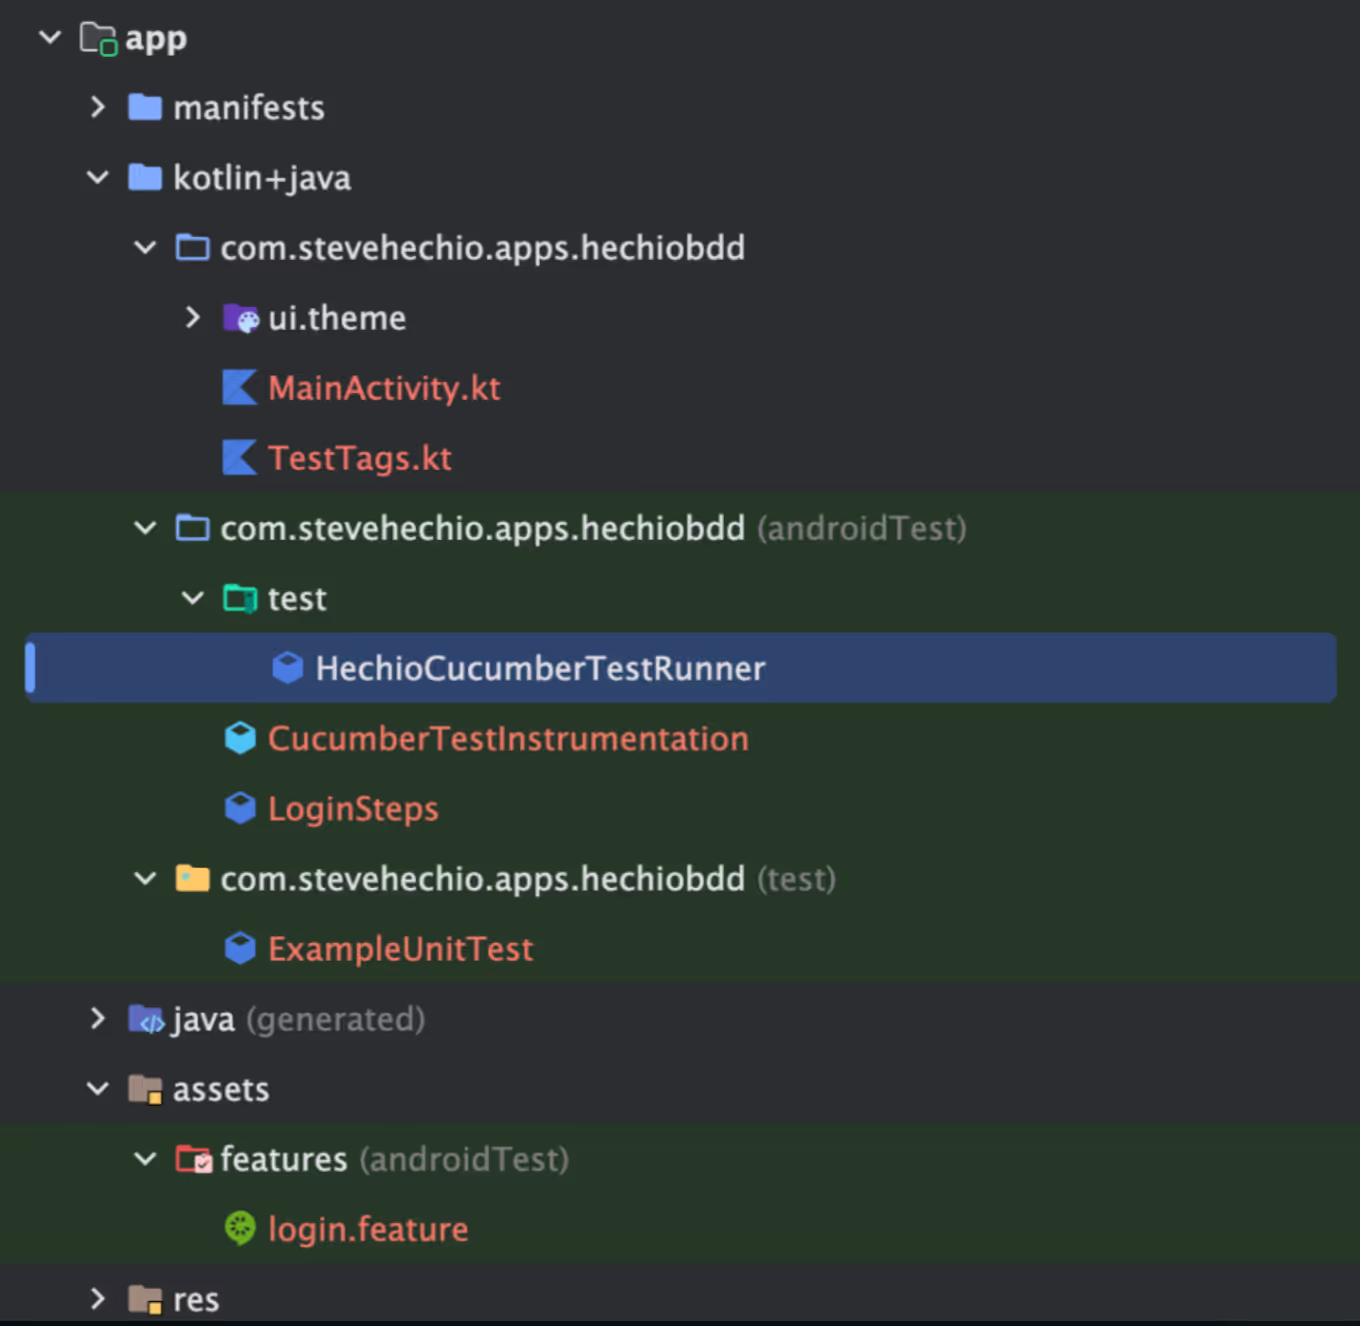
Create an assets directory in app/src/androidTest/assets and add a folder called features. This is where you will add your feature file containing the above step definitions written in English.
Add a new .feature file called login.feature and add the feature steps above.
4. Implement the Scenario Steps Using the Espresso Framework
In app/src/androidTest/java/com/your/app/, create a Kotlin class called LoginSteps. This is where you will write your tests to implement the steps in login.feature.
Here is a code snippet of the implementation of the steps:
@Given("^the login screen is displayed to the customer$")
fun theLoginScreenIsDisplayedToTheCustomer() {
   composeTestRule.setContent {
      LoginScreen()
   }

   composeTestRule.onNodeWithTag(LOGIN_SCREEN).assertIsDisplayed()
   composeTestRule.onNodeWithTag(LOGIN_SCREEN_EMAIL).assertIsDisplayed()
   composeTestRule.onNodeWithTag(LOGIN_SCREEN_PASSWORD).assertIsDisplayed()
   composeTestRule.onNodeWithTag(LOGIN_SCREEN_BUTTON).assertIsDisplayed()
   composeTestRule.mainClock.advanceTimeBy(500)
}

@When("^the customer enters email \"([^\"]*)\"$")
fun theCustomerEntersEmail(email: String) {
       composeTestRule.onNodeWithTag(LOGIN_SCREEN_EMAIL).performTextInput(email)
       composeTestRule.mainClock.advanceTimeBy(500)
       composeTestRule.onNodeWithTag(LOGIN_SCREEN_EMAIL).assertExists().assert(hasText(email))
}
5. Provide Cucumber Options
Before running your tests, you must provide the packages containing the step definitions and glue them to your steps.
In app/src/androidTest/java/com/your/app, create a folder called testand add a new Kotlin class.
@RunWith(Cucumber::class)
@CucumberOptions(
features = ["src/androidTest/assets/features/login.feature"],
glue = ["com.stevehechio.apps.hechiobdd.LoginSteps"],
monochrome = true
)
class HechioCucumberTestRunner
Finally, you can run your test, but first, confirm your project structure looks like this:

Run Tests
To run your tests:
- Open Edit Configuration.
- Click + on the left panel and select
Android Instrumented Tests. - Write the name to match the feature’s name, so it’s easy to remember. In this case, that’s
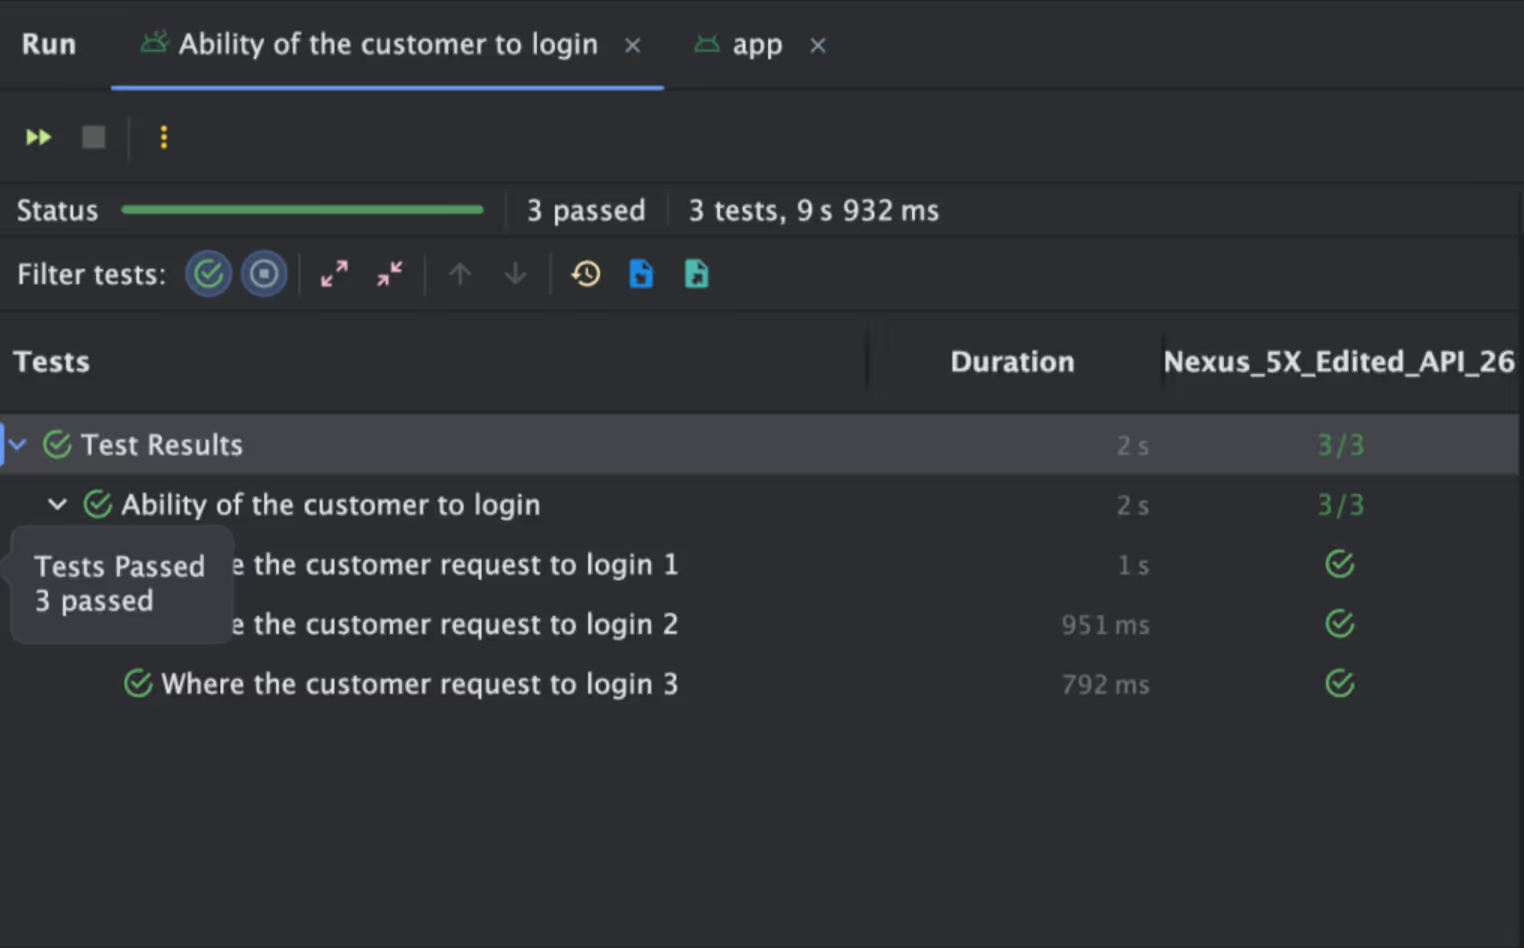
Ability of the customer to login. Then click Run or OK to run or debug it later from the IDE toolbar.
Here is the result of the implementation above.

Conclusion
Bridging the gap between technical and nontechnical stakeholders is crucial for effective software development. Behavior-driven development facilitates collaboration and communication in natural language.
Tools like Cucumber help implement BDD using executable specifications as automated tests, allowing teams to create clear, shared documentation. Integrating Cucumber into your Android application development can enhance team alignment and streamline development.
For more insight, access my Hechio BDD reference project or the cucumber/cucumber-android project, which provides Android support for Cucumber-JVM.
About The Author: Stephen Henry
Stephen Henry is a mobile engineer and a technologist at Andela. Stephen is highly experienced in mobile application development, with a specialized focus on iOS and Android platforms. He is skilled in various programming languages including Swift, Kotlin and Java, and is an expert in optimizing app performance, crafting user-friendly interfaces and seamlessly integrating third-party APIs.


.avif)


.png)


