.avif)
Computer vision is a field in computer science that uses AI to enable computers to understand and recognize people and objects in images and videos. Computer vision can identify individuals in a photograph by analyzing the image and determining what appears to be a person. Let’s work together on a simple yet detailed project where we’ll provide the computer with my picture to see whether it recognizes me. But first, let’s cover a few important terms you need to understand.
Bounding box: A rectangular border that the computer draws around an identified object in an image or video. To identify a person in a photograph, the computer would draw a bounding box around each person it detects. We will see this in action later.
Intersection over union (IoU): This metric measures how accurately the predicted bounding box aligns with the actual object, known as the ground truth. The ground truth refers to the true object we aim to identify. IoU helps us determine how closely the computer’s prediction matches this true object.
The IoU value ranges from 0 to 1. If the predicted bounding box perfectly overlaps the ground truth, the IoU is 1. Conversely, if there is no overlap, the IoU is 0. For partial overlaps, the IoU is calculated using the formula: IoU = Area of intersection / Area of union of the predicted bounding box and the ground truth.
There are many more terms that are critical to computer vision, but you can familiarize yourself with them here. You can also find the complete code for this project here.
Prerequisites
Before you begin, ensure you have the following:
- Python installed: This article uses Python 3.12.4. You can check your Python version by running the command:
python --version
If you encounter an error, ensure Python is installed correctly. You can download Python from the official website.
- Text editor: This tutorial uses Visual Studio Code (VS Code) as the text editor. You can download VS Code
- here
- . However, feel free to use any text editor you choose.
Before diving into our project, it’s essential to set up a clean working environment. Here’s how to do it step by step:
- Create a project folder: First, choose a location for your project folder. For this tutorial, we will create it on the desktop.
On macOS:
- Navigate to your desktop.
- Create a new folder named, for example, “facial-recognition.”
- Open the terminal in this folder by clicking on it and pressing
Ctrl + Cmd + C.
On Windows:
- Navigate to your desktop.
- Create a new folder, for example, “facial-recognition.”
- Right-click the folder and select “Open in Terminal” or “Open PowerShell window here.”
- Create and activate a virtual environment: This helps keep project dependencies isolated from the global Python installation.
- Create a virtual environment:In your terminal, run the following command to create a virtual environment named
- venv
- inside the project folder:
python -m venv venv
- Activate the virtual environment:To activate the virtual environment, use the following commands based on your operating system:
source venv/bin/activate //activate virtual environment on mac
.\venv\Scripts\activate //activate virtual environment on windows
Once the virtual environment is activated, your terminal will appear like this.

NOTE: As shown in the image above, I am creating a virtual environment using python3. This is necessary because I have two different Python installations on my computer, so I need to specify the version I am using.
With the setup complete, we can now create our main.py file, where we will write our code step by step. Additionally, we’ll place the image in a folder called “images” within the same directory. This image will be used later to identify me from the webcam feed.
We are now going to install a library called OpenCV. This is a crucial library because it significantly reduces the amount of code we need to write. OpenCV provides numerous prebuilt functions that we can use without having to rewrite the underlying logic. Run the command below to install OpenCV:
pip install opencv-python#import open cv
import cv2
import time
#here, we load the pre-built Haar Cascade model
face_classifier = cv2.CascadeClassifier(
cv2.data.haarcascades + "haarcascade_frontalface_default.xml"
)
def detect_faces():
# Access the webcam
cap = cv2.VideoCapture(0)
if not cap.isOpened():
print("Error: Could not open webcam.")
return
# Allow the webcam some time to initialize
time.sleep(2)
while True:
# Read the frame from the webcam
ret, frame = cap.read()
# Check if the frame was read successfully
if not ret:
print("Error: Failed to capture image from webcam")
break
# Check if the frame is empty
if frame is None:
print("Error: Received empty frame from webcam")
continue
try:
# Convert the frame to grayscale
gray = cv2.cvtColor(frame, cv2.COLOR_BGR2GRAY)
# Detect faces in the grayscale frame
faces = face_classifier.detectMultiScale(gray, 1.1, 5)
# Draw rectangles around the faces
for (x, y, w, h) in faces:
cv2.rectangle(frame, (x, y), (x + w, y + h), (255, 0, 0), 2)
# Display the frame with face detections
cv2.imshow("Face Detection", frame)
except cv2.error as e:
print(f"OpenCV Error: {e}")
break
# Exit loop if 'q' key is pressed
if cv2.waitKey(1) & 0xFF == ord('q'):
break
# Release the webcam and close all OpenCV windows
cap.release()
cv2.destroyAllWindows()
# Call the function to start the webcam feed
detect_faces()
Copy and paste the code above into your main.py file. Now, let’s break down the code to understand what’s happening.
On line 1, we import the OpenCV library that we installed earlier. This allows us to access its prebuilt functions and classifier. We also import the time utility to handle delays in our program.
Next, we load a prebuilt Haar Cascade classifier named haarcascade_frontalface_default.xml. This classifier is specifically designed for detecting frontal faces in visual input.
After loading the model, we define a function called detect_faces. In this function, we first access the webcam feed and assign it to a variable called cap using cap = cv2.VideoCapture(0). We then check if the webcam stream is open with if not cap.isOpened():. If it’s not open, we print an error message and stop execution.
To ensure the webcam initializes properly, we add a delay using time.sleep(2) before entering a while True loop. Inside this loop, which continues as long as cap is open, we continuously read frames from the webcam feed and perform several checks. If frames are read successfully (if ret:), we proceed. If the frame is not open (if frame is None:), we print an error message; otherwise, we continue with our execution.
After entering the try block, our first step is to convert each frame to grayscale. Subsequently, using the previously defined classifier, we detect all faces present in the grayscale image. Following this, a for loop iterates over each detected face, drawing a blue bounding box around it. These annotated frames displaying the face detections are then shown. If an error occurs during this process, it will be printed for visibility. The loop is designed to exit upon pressing the “q” key. Finally, we release the webcam resources and close all active OpenCV windows before calling detect_faces() to initiate the face detection process again.
With the code explained, here’s what you can expect as the outcome:
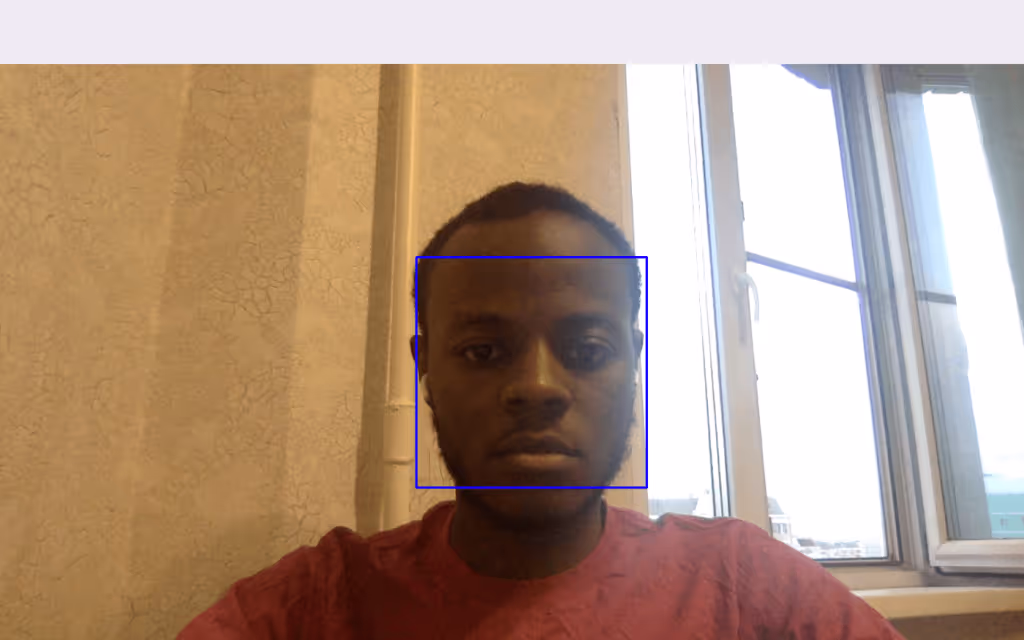
Now that a successful face detection is achieved, the next step involves comparing the detected face with the image stored earlier in the “images” folder. If there’s a match, my name will be displayed alongside the bounding box; otherwise, no additional information will be displayed.
To achieve this, we’ll need to make some modifications to the code. First, install a library called face_recognition and the models it requires. Next, assign the path of the reference image to a variable and load the image. We will then encode the reference face. In the for loop, we’ll resize the face region for facial recognition, which, while optional, is recommended. After resizing, we’ll encode the detected face. To handle errors, we’ll include a check to ensure that the encoded_face array contains at least one item. If the array is not empty, we will compare it with the reference image face encoding. If a match is found, we will display “Raymond” next to the bounding box; otherwise, nothing will be printed.
pip install face_recognition
pip install git+https://github.com/ageitgey/face_recognition_models
pip install setuptools //to solve the bug of face_recognition_models not being recognized as installed
import cv2
import os
import face_recognition
import time

# Path to the reference image in the images folder
reference_image_path = 'images/profile-headshot.jpg'

# Load the reference image
reference_image = face_recognition.load_image_file(reference_image_path)
reference_encoding = face_recognition.face_encodings(reference_image)[0]

# Load the pre-built Haar Cascade model for face detection
face_classifier = cv2.CascadeClassifier(cv2.data.haarcascades + 'haarcascade_frontalface_default.xml')

def accessWebcam():
   # Access the webcam
   cap = cv2.VideoCapture(0)
   if not cap.isOpened():
       print("Error: Could not open webcam.")
       return

   # Allow the webcam some time to initialize
   time.sleep(2)

   while True:
       # Read the frame from the webcam
       ret, frame = cap.read()

       # Check if the frame was read successfully
       if not ret:
           print("Error: Failed to capture image from webcam")
           break

       # Convert the frame to grayscale for face detection
       gray = cv2.cvtColor(frame, cv2.COLOR_BGR2GRAY)

       # Detect faces in the grayscale frame
       faces = face_classifier.detectMultiScale(gray, 1.1, 5)

       # Process each detected face
       for (x, y, w, h) in faces:
           # Extract the face region from the frame
           face_region = frame[y:y+h, x:x+w]

           # Resize the face region for face recognition (optional but recommended)
           face_region_resized = cv2.resize(face_region, (128, 128))

           # Encode the detected face
           face_encoding = face_recognition.face_encodings(face_region_resized)

           # Compare the detected face encoding with the reference face encoding
           if len(face_encoding) > 0:
               match = face_recognition.compare_faces([reference_encoding], face_encoding[0], tolerance=0.5)

               # If match is found, display the name on the bounding box
               if match[0]:
                   cv2.rectangle(frame, (x, y), (x + w, y + h), (0, 255, 0), 2)
                   cv2.putText(frame, "Raymond", (x, y - 10), cv2.FONT_HERSHEY_SIMPLEX, 0.9, (36,255,12), 2)
               else:
                   cv2.rectangle(frame, (x, y), (x + w, y + h), (255, 0, 0), 2)
           else:
               cv2.rectangle(frame, (x, y), (x + w, y + h), (255, 0, 0), 2)

       # Display the frame with face detections
       cv2.imshow("Face Detection", frame)

       # Break the loop on 'q' key press
       if cv2.waitKey(1) & 0xFF == ord('q'):
           break

   # Release the webcam and close all OpenCV windows
   cap.release()
   cv2.destroyAllWindows()

# Call the function to start the webcam feed
accessWebcam()
If you encounter the runtime error RuntimeError: Unsupported image type, must be 8bit gray or RGB image., you can resolve it by downgrading NumPy to version 1.26.4. This issue is associated with NumPy 2.0. To downgrade, simply run the following command:
pip install numpy==1.26.4
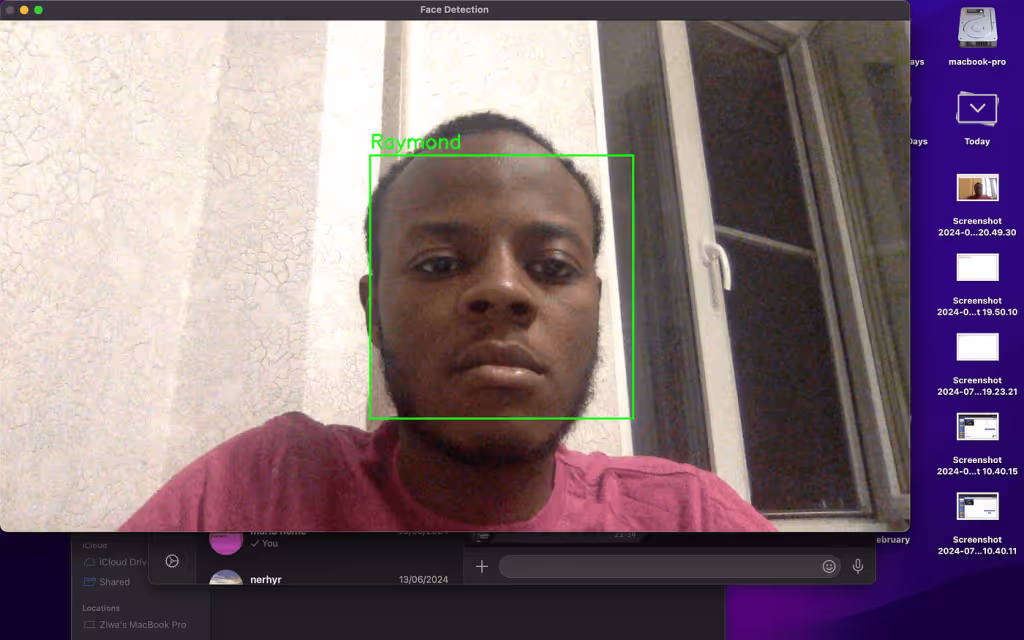
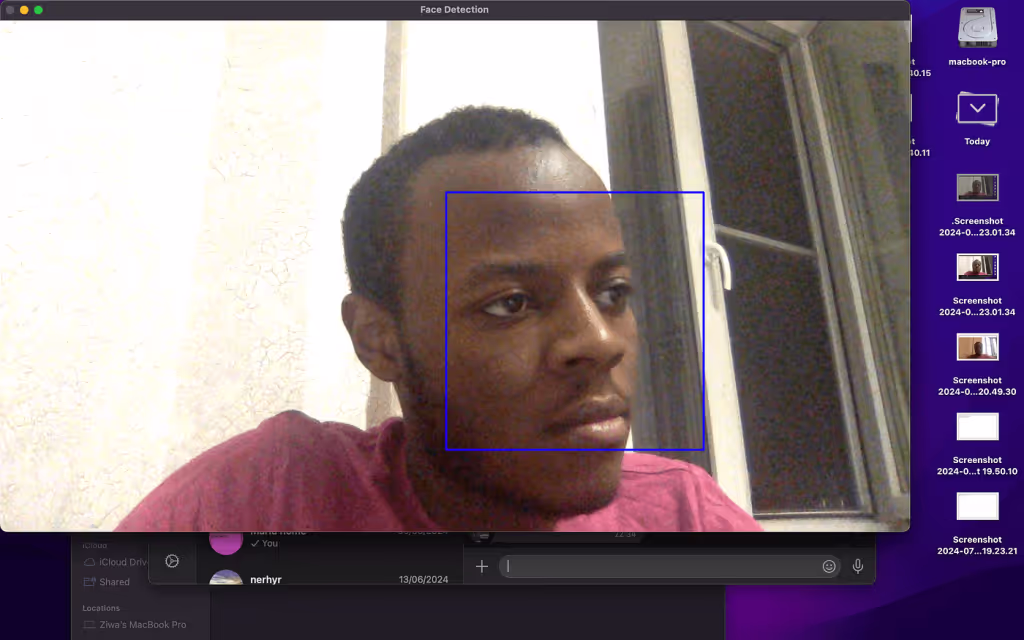
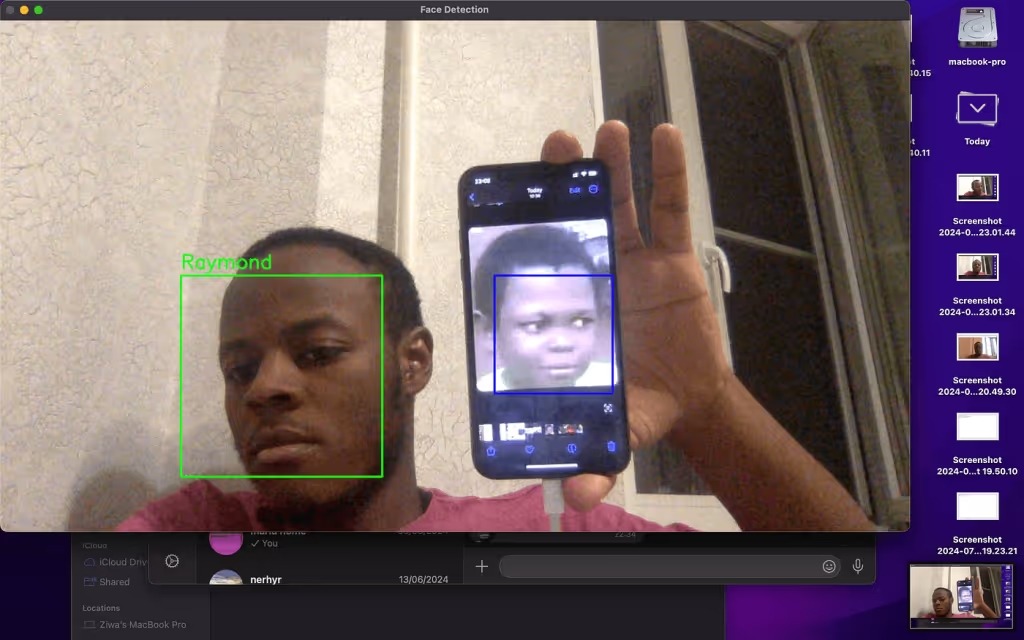
Now, let me demonstrate the results of our work. You’ll notice that when my face is recognized, the bounding box turns green and my name is displayed next to it. If the face is not recognized, the bounding box remains blue. Additionally, I tested the system by showing a second face from my phone. While the model detected the face, it didn’t recognize it, so the bounding box for that face stayed blue, whereas my face was highlighted with a green bounding box due to its familiarity with the model.
Computer vision offers a wealth of opportunities for innovation and problem-solving, enabling us to create applications that can interpret and respond to visual information in meaningful ways. From enhancing security through face recognition to enabling autonomous systems, the possibilities are vast and exciting. As technology continues to advance, the integration of computer vision into various domains will undoubtedly lead to groundbreaking developments and new applications. I encourage you to explore further and experiment with these techniques, as they hold the promise of transforming the way we interact with the world around us.