In today’s digital world, managing user authentication effectively and securely is more important than ever. Traditional methods, like custom login forms and password management systems, can be tricky and vulnerable to security problems.
That’s where third-party authentication systems like Google’s OAuth 2.0 come in. They provide a smooth and secure way to handle user logins. By integrating Google authentication into your Next.js application, you make it easier for users to log in with their Google accounts, while also simplifying your authentication process. In this guide, we’ll show you how to set up Google authentication in a Next.js app, including configuring your Google API credentials and using NextAuth for seamless authentication flows.
Understanding OAuth 2.0 and Google Authentication
OAuth 2.0 is an authorization framework that lets apps access user resources without exposing credentials. It uses access tokens to grant limited access to user data, keeping passwords safe and separating authentication from authorization.
Google authentication uses OAuth 2.0 for a streamlined login process. Users sign in with Google and, after consent, an authorization code is exchanged for an access token. This token allows apps to access user data from Google’s APIs.
Tokens are temporary and need refreshing; a refresh token helps obtain new access tokens without user interaction. Proper token handling and security practices are crucial for protecting user data and ensuring a smooth experience. Integrating Google authentication involves setting up OAuth 2.0 credentials in the Google Cloud Console and using client libraries to manage the flow.
Prerequisites
Before you start integrating Google authentication into your Next.js app, make sure you have:
- Basic knowledge of JavaScript and React
- Familiarity with JavaScript and React fundamentals will help you follow along with the implementation.
- Understanding of Next.js
- Basic experience with Next.js, including creating pages and managing routing, is needed.
- Google account
- You’ll need a Google account to set up OAuth 2.0 credentials.
- Node.js and npm/YARN installed
- Ensure you have Node.js and npm or YARN installed on your machine.
- Basic understanding of OAuth 2.0
- A general idea of how OAuth 2.0 works will be useful.
These steps will ensure you’re ready to integrate Google authentication smoothly into your Next.js app.
Setting Up Google API Credentials
Before you can integrate Google authentication into your Next.js app, you’ll need to set up OAuth 2.0 credentials in the Google developer console.
1. Create a project in the Google developer console.
- Go to the Google developer console.
- Create an account if you don’t have one already.
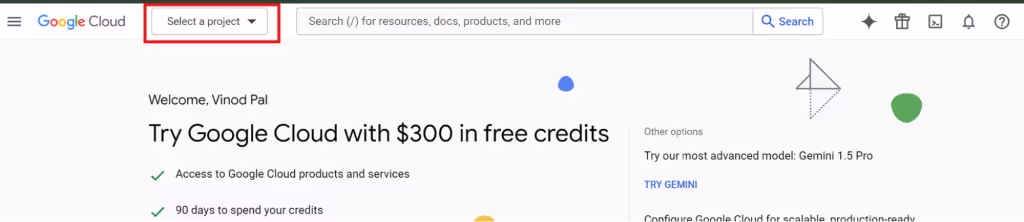
- Click on “Select a project,” and then click “New Project.”
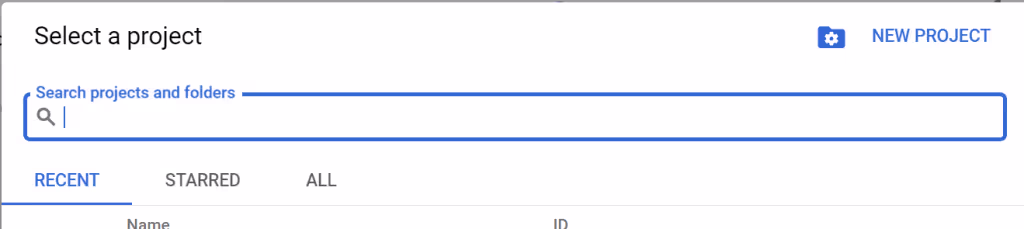
- Enter a project name and then click “Create.”
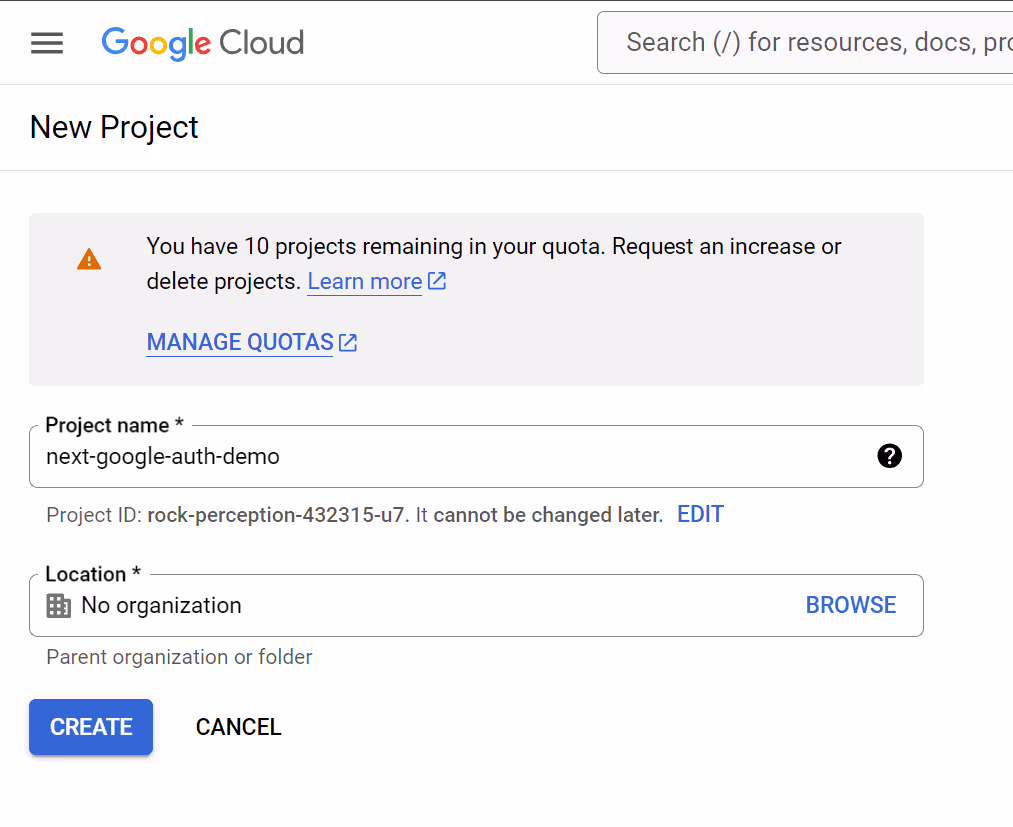
- After that, you should see your app selected in the Google developer console.
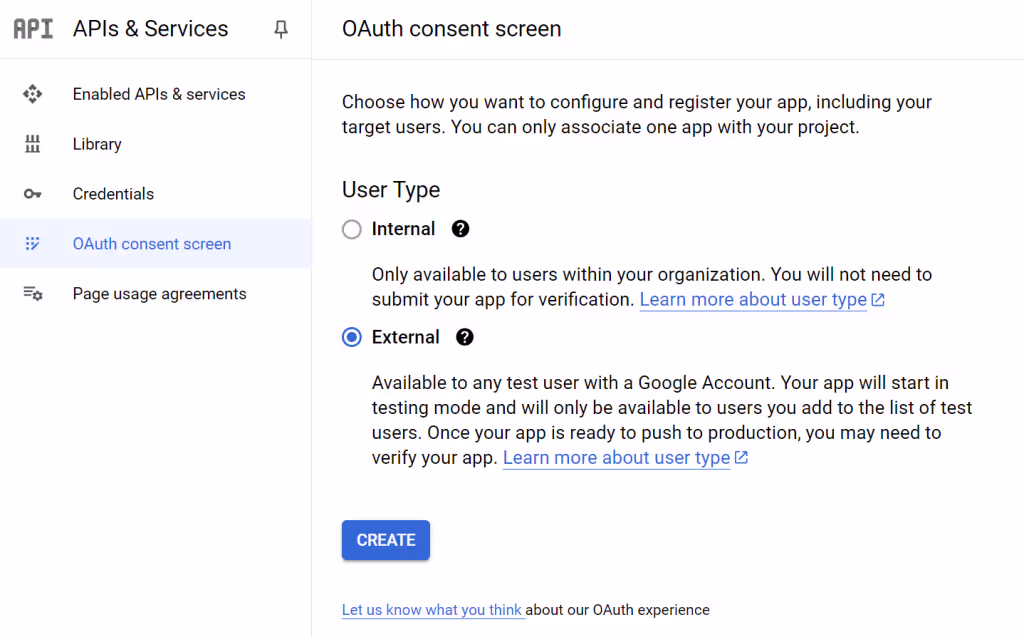
2. Configure the OAuth consent screen.
- Navigate to the “OAuth consent screen” tab by searching for it in the search tab.

Choose “External” or “Internal,” depending on your needs. Here, I am selecting “External” as I have to publish it for external users.
- Fill in the required details, such as application name, support email and authorized domains.
- Add scopes, if needed (for Google sign-in, default scopes are usually sufficient).
- Since we opted for an external user type, we need to specify tester email IDs. These are the email addresses of users who should be able to access your authentication service during the testing phase. Typically, these would be your testers or you can include your email address as well.
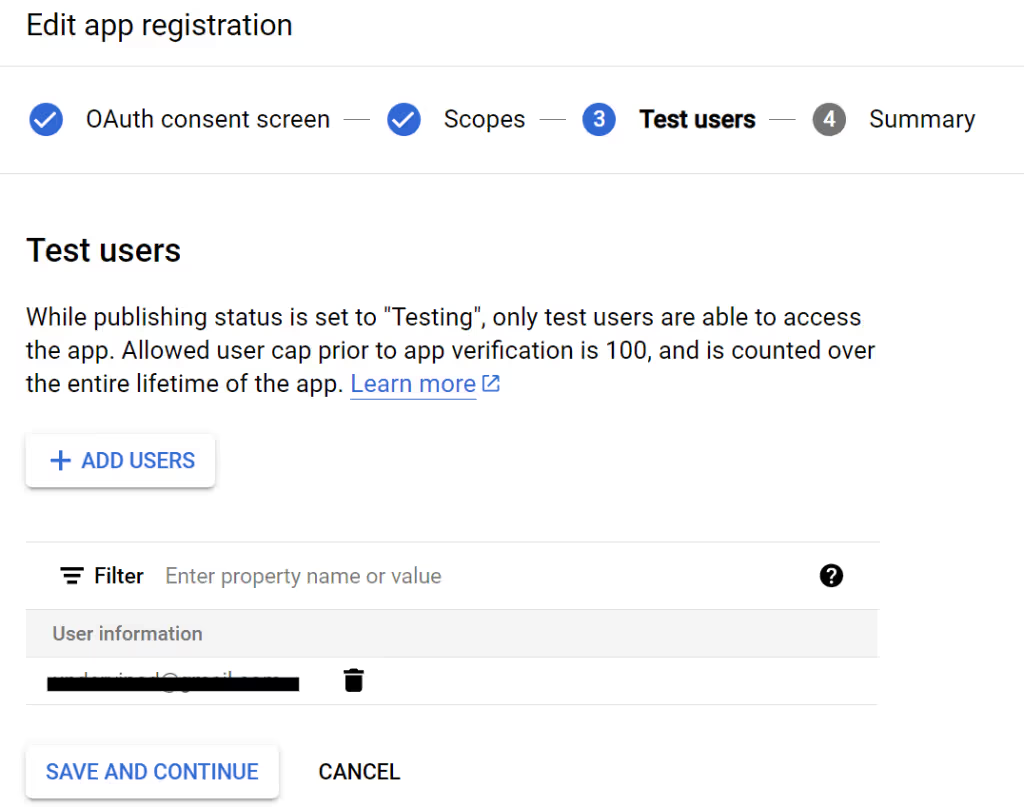
Save and continue.
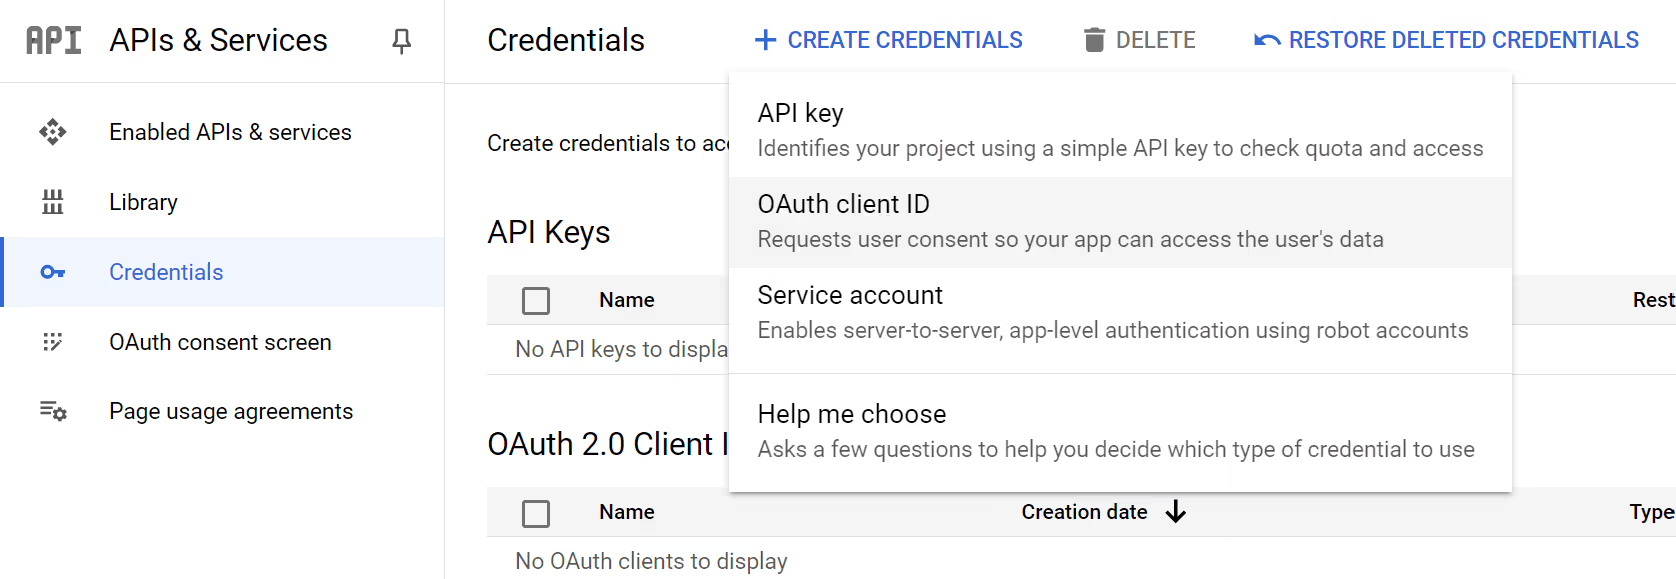
3. Create OAuth 2.0 credentials.
- Go to the “Credentials” tab.
- Click “Create Credentials” and select “OAuth 2.0 Client ID.”
Choose “Web application” as the application type.
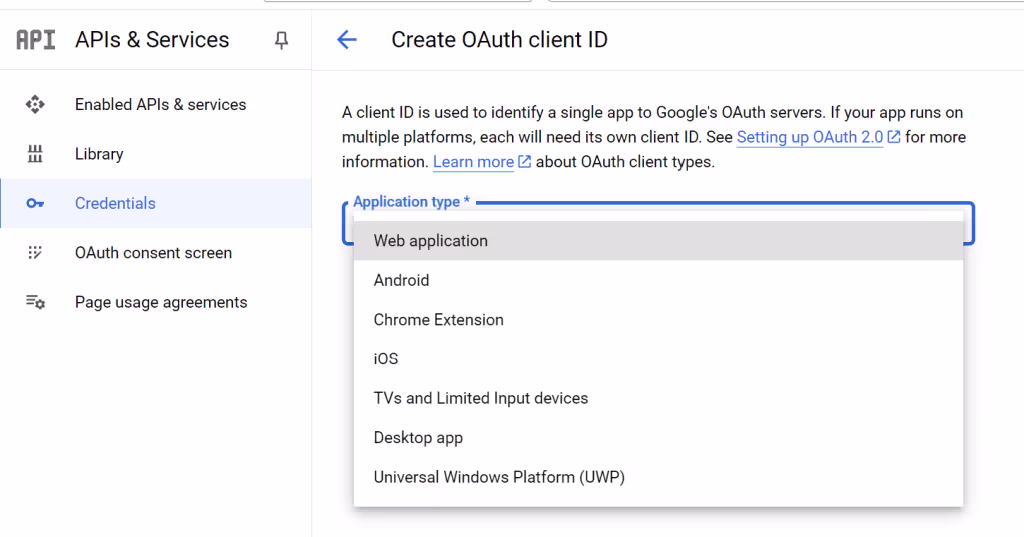
- Set the “Authorized JavaScript origins” to your Next.js application URL (such as
http://localhost:3000for local development). - Set the “Authorized redirect URIs” to your Next.js callback route (for instance,
http://localhost:3000/api/auth/callback/google). - Click “Create” and note down the “Client ID” and “Client Secret.”

Please ensure that you record the client ID and client secret, as you cannot access these details once you leave this screen. If you forget them, you will need to regenerate a new client ID and secret.
Creating a Next.js Application
Next.js is a powerful React framework that provides a range of features for building modern web applications, including server-side rendering, static site generation and API routes. To start a new Next.js project, you’ll first need to set up the project environment. If you haven’t created a Next.js application yet, follow these steps:
You can create a new Next.js application using the create-next-appcommand. This command creates a new Next.js project with all the necessary boilerplate code and configurations. Open your terminal and run the following command to create a new Next.js app named “next-google-auth-demo-app”:
npx create-next-app@latest next-google-auth-demo-app
I used the default options when creating the Next.js app for simplicity. However, you can select different options based on your specific needs.
This will generate a new directory called next-google-auth-demo-app with the initial project structure and default dependencies.
Navigate to the Project Directory:
Change into the newly created project directory using:
cd next-google-auth-demo-app
Installing Required Packages
To integrate Google authentication, you’ll need to install next-auth, simplifying the process of adding authentication to your Next.js application.
Install NextAuth.js:npm install next-auth
You can open this directory in your preferred IDE. I’m using VS Code, and the folder structure should look something like this:

Set Up Environment Variables
If you do not already have an environment variables file, you can create a new file called “.env” in the root of the project.
Add your Google credentials to your .env file:
NEXTAUTH_URL=http://localhost:3000
NEXTAUTH_SECRET=mysecret
GOOGLE_CLIENT_ID=YOUR_CLIENT_ID
GOOGLE_CLIENT_SECRET=YOUR_CLIENT_SECRET
The .env file is where you place environment variables — key-value pairs that define how your application operates. These variables are read at runtime, so they help configure your app without hard coding values directly into your codebase. This approach not only enhances security but also makes it easier to manage different configurations for various environments like development, staging and production.
NEXTAUTH_URL=http://localhost:3000: This variable sets the base URL for your authentication flow. In development, it points to your local server. When deploying, you’ll update it to reflect your production URL.
NEXTAUTH_SECRET=mysecret: This is a secret used to sign and encrypt session tokens and other sensitive data. It ensures that authentication processes remain secure. Always keep this secret private and unique.
GOOGLE_CLIENT_ID and GOOGLE_CLIENT_SECRET: These credentials are used for Google authentication. You can review the steps above where we generated the client ID and client secret.
Configuring NextAuth.js for Google Authentication
NextAuth.js is a powerful library designed to streamline authentication in Next.js applications. It provides a flexible and easy solution for integrating various authentication providers like Google, GitHub and many more. With NextAuth.js, developers can handle complex authentication flows with minimal setup and configuration. It supports a wide range of authentication strategies, including OAuth, email-based sign-in and custom credentials, making it an ideal choice for modern web applications that require secure and scalable authentication solutions.
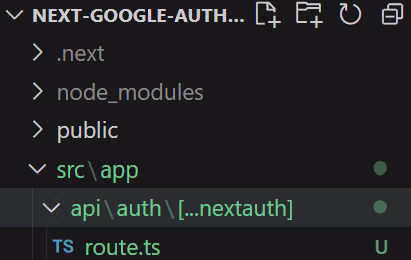
Now inside the src/app directory, create a new folder structure asapi/auth/[…nextauth]. In this folder, add a file named “route.ts.” The […nextauth] segment indicates to NextAuth that all files and contents within this directory are designated for handling authentication-related operations.
This is what it would look like:
import NextAuth from "next-auth";
import GoogleProvider from "next-auth/providers/google";
export const authOptions = {
  providers: [
    GoogleProvider({
      clientId: process.env.GOOGLE_CLIENT_ID ?? "",
      clientSecret: process.env.GOOGLE_CLIENT_SECRET ?? "",
    }),
  ],
};
export const handler = NextAuth(authOptions);
export { handler as GET, handler as POST };
Here, we’re configuring authentication for a Next.js application using NextAuth.js with Google as the authentication provider.
The main entry point for NextAuth.js is the NextAuth method, which we will import from next-auth. We’ll also import Google Provider from next-auth/providers/google, which will handle the Google sign-in functionality.
We then define an authOptions object to specify our authentication configuration. This object includes a providers array, where we set up the Google provider. We provide clientId and clientSecret, which are fetched from environment variables to ensure that sensitive information like API credentials is kept secure.
Next, we initialize NextAuth by passing authOptions to it and assign the result to the handler. This handler will manage the authentication requests.
Finally, we export the handler for both GET and POST requests. This setup allows NextAuth to handle user authentication and session management for our application, supporting both sign-in and sign-out operations.
Add a SessionProvider Component
In the src/app folder, create a new folder named “components.” Inside this folder, add a file named “SessionProvider.tsx.”
"use client";
import { SessionProvider } from "next-auth/react";
export default SessionProvider;
Here, we’re setting up a SessionProvider component in a Next.js application using NextAuth.js.
The file starts with “use client,“ which indicates that the component should be rendered on the client side. This is crucial for components that rely on client-side features, like managing user sessions.
We then import SessionProvider from next-auth/react. This component is essential for providing authentication session context throughout our application. It ensures that session data is available to all components within its scope.
Finally, we export SessionProvider as the default export from this file. By doing this, we make it easy to import and use SessionProvider elsewhere in our application, ensuring that the authentication state is consistently managed and accessible across different parts of the app.
Update the layout.tsx File
Now remove all the boilerplate code from the layout.tsx file and below code into it.
import type { Metadata } from "next";
import { Inter } from "next/font/google";
import "./globals.css";


const inter = Inter({ subsets: ["latin"] });
import SessionProvider from "./components/SessionProvider";
import { getServerSession } from "next-auth";


export const metadata: Metadata = {
  title: "Create Next App",
  description: "Generated by create next app",
};


export default async function RootLayout({
  children,
}: Readonly<{
  children: React.ReactNode;
}>) {
  const session = await getServerSession();
  return (
    <html lang="en">
      <body className={inter.className}>
        <SessionProvider session={session}>
          <main className="mx-auto max-w-5xl text-2xl flex gap-2">
            {children}
          </main>
        </SessionProvider>
      </body>
    </html>
  );
}
Within the RootLayout component, we use the SessionProvider to wrap our application. By passing the session obtained from getServerSession, we ensure that the authentication state is available throughout the application. This setup allows all child components to access session information, enabling consistent and reliable authentication management across the entire app.
Create a Navigation Menu
Now that we’ve completed the setup, let’s create a navigation menu. Create a file named NavMenu.tsx in the components folder.
"use client";
import Link from "next/link";
import { signIn, signOut, useSession } from "next-auth/react";


function AuthButton() {
  const { data: session } = useSession();
  return (
    <div className="flex items-center space-x-4">
      {session ? (
        <>
          <span className="font-medium text-gray-300">
            {session?.user?.name}
          </span>
          <button
            onClick={() => signOut()}
            className="px-4 py-2 bg-red-700 text-white rounded hover:bg-red-800 transition duration-150"
          >
            Sign Out
          </button>
        </>
      ) : (
        <>
          <span className="text-gray-400">Not signed in</span>
          <button
            onClick={() => signIn()}
            className="px-4 py-2 bg-blue-700 text-white rounded hover:bg-blue-800 transition duration-150"
          >
            Sign In
          </button>
        </>
      )}
    </div>
  );
}


export default function NavMenu() {
  return (
    <div className="bg-gray-800 shadow-md fixed top-0 inset-x-0 z-10">
      <div className="container mx-auto flex justify-between items-center p-4">
        <Link
          href="/"
          className="text-xl font-semibold text-gray-200 hover:text-gray-100"
        >
          Home
        </Link>
        {/* <div className="flex space-x-4"> */}
        <Link href="/protected" className="text-gray-200 hover:text-gray-100">
          My Account
        </Link>
        <AuthButton />
        {/* </div> */}
      </div>
    </div>
  );
}
Here, we have a navigation menu component that includes authentication controls. The AuthButton component uses the useSession hook from NextAuth.js to check the user’s session status. If a user is signed in, it displays their name and a “Sign Out” button. Clicking “Sign Out” triggers the signOut function to log the user out. If the user is not signed in, it shows a “Not signed in” message and a “Sign In” button that triggers the signInfunction.
The NavMenu component incorporates AuthButton into a fixed navigation bar. This setup ensures that users can easily sign in or out from anywhere in the app, with the authentication state reflected immediately in the navigation menu.
Create a Restricted Component
Now, let’s create a restricted component that will only be accessible to logged-in users. In the src/app folder, create a new folder named “protected” and inside it create a file named “page.tsx.” Add the following code to this file:
import { redirect } from "next/navigation";
import { getServerSession } from "next-auth";
import NavMenu from "../components/NavMenu";
export default async function ProtectedRoute() {
  const session = await getServerSession();
  if (!session || !session.user) {
    redirect("/api/auth/signin");
  }
  return (
    <>
      <NavMenu />
      <div className="pt-16 min-h-screen text-gray-100">
        <main className="flex flex-col items-center justify-center px-4 py-8">
          <h1 className="text-4xl font-extrabold mb-4">My account details</h1>
          <p className="text-lg">
            You will only see this page if you are logged in.
          </p>
        </main>
      </div>
    </>
  );
}
The ProtectedRoute component checks if a user is authenticated by using getServerSession from NextAuth.js. If no valid session is found, it redirects the user to the sign-in page using the redirect function from next/navigation. This ensures that only authenticated users can access the content of this route.
If the user is authenticated, the component displays the NavMenu and a message indicating that the page is accessible only to logged-in users. This setup effectively protects sensitive content from unauthorized access.
Create the Home Page
Finally, let’s create the home page. In the src/app folder, create a file named page.tsx. Remove all the boilerplate code and replace it with the following code:
"use client";


import NavMenu from "./components/NavMenu";


export default function Home() {
  return (
    <>
      <NavMenu />
      <div className="pt-16 min-h-screen text-gray-100">
        <main className="flex flex-col items-center justify-center px-4 py-8">
          <h1 className="text-4xl font-extrabold mb-4">Welcome to Home page</h1>
        </main>
      </div>
    </>
  );
}
The Home component includes the NavMenu, which houses authentication controls like sign-in and sign-out buttons. This ensures that the navigation bar, with its authentication features, is present on the Home page.
Below the NavMenu, the component displays a welcome message centered on the page. By including the NavMenu, we make sure that users can manage their authentication status directly from the Home page.
Testing the Integration
With the configuration complete, it’s time to test your authentication setup.
Start the Next.js Development Server:npm run dev
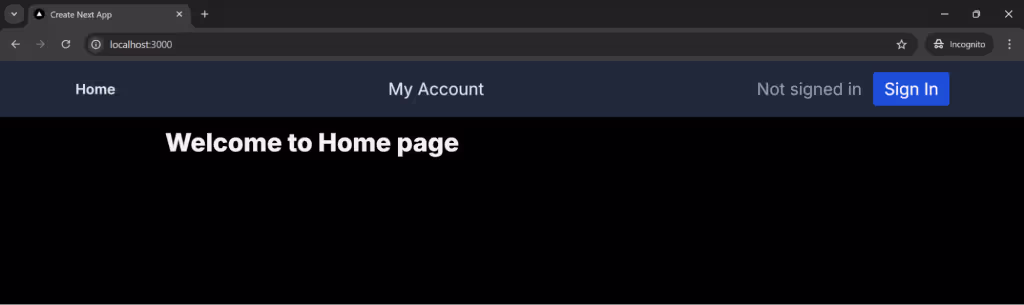
This will provide the URL where the project is running locally, typically “http://localhost:3000”. Visit this URL, and you should see our home page displayed as follows:
Next, click on the “Sign In” button. This will present the option to sign in using Google.

When you click on this option, a Google sign-in page will appear. Enter the credentials using one of the tester emails that we registered during the configuration of the application on the Google platform. Once the sign-in is successful, you should see the home page displayed as follows:

Next, test the “My Account” tab. You should only be able to access this page if you are logged in; otherwise, you will be redirected to the login page.

With this setup, you’re now equipped to integrate additional authentication providers such as GitHub, Azure, Amazon, Okta and others. For more details and options, check out the NextAuth documentation.
Conclusion
Implementing third-party authentication in a Next.js application can greatly enhance the user experience by simplifying the login process and leveraging secure, established authentication providers like Google. By following the steps outlined in this guide, you will have set up Google authentication using NextAuth.js, configured your application and created custom authentication pages.
NextAuth.js offers a robust and flexible solution for managing authentication in Next.js apps. It supports multiple authentication providers, including Google, and provides a range of features to customize and extend authentication functionality.
Feel free to explore the NextAuth.js documentation and Google API documentation to further tailor the authentication experience to your needs.
About the author: Vinod Pal
Vinod Pal is a full-stack developer and a member of the Andela network, a private global talent marketplace. With an eight-year track record of building end-to-end products, he specializes in .NET, NodeJs, React and Angular. He has developed microservices using different frameworks, and has also worked on mobile architecture, created progressive enterprise web apps, integrated payment gateways into web apps, and building scalable applications that can handle high traffic volumes.